
Preparation
The first step was collecting the materials. The ingredients list is pretty simple: barro (soil with a fairly high clay content), arena (sand), estiércol (horse or cow poo), and agua (water). We had actually collected barro and estiercol a while ago with them, and stored it in their chicken coop. The problem came when we did a soil test.

(Results from a good soil test; note the layers - at the top, orangish water that will eventually settle to clear, then a half inch layer of clay, then an orangish soil layer, then the big stuff at the bottom of the 2-liter. Color is not very important, this one just happened to be an orangish soil)
The soil we had collected at Cecilia and Eduardo's didn't show a nice clear thick layer of clay. In a 2 liter bottle test you fill it 1/4 way with soil and hope for 3/4-1 inch of clay. Without enough clay content, the "brick" that becomes the stove wouldn't hold together well. So we had to search for different soil.
We tried a couple other spots near their house, but they didn't have better layers, and Eduardo found a seam of pure clay near the shore, but that wouldn't mix with the other ingredients well, it just formed small balls and rolled off. Finally, we hiked ten minutes up into their pasture and collected small pea sized clay chunks from an ant hill; the ants dig down into the ground to make their home and dump the more clay heavy soil around their hole. The pile was probably two feet tall and three feet around, and was more than enough to augment our existing pile of low-clay soil.
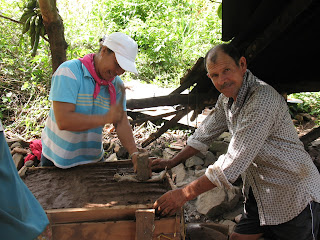
The estiercol was the next problem. It is best collected in dry lumps of cow or horse manure, but it needs to be more of a dust to mix with the other ingredients. So Cecilia and Eduardo ended up putting it in their pilon and pilar-ing it to get it into a dust. (Click here to see a video of pilar-ing rice.)
The arena was simple, since they live on one of the best sandy beaches on the island. The water was not too hard either.
The last prep step was building a base for the stove. Cecilia wanted a cement table, although any really strong table like a packed earth or stone will work too. We measured the height she would want her pots to be at, then subtracted the height of the estufa, and came up with a two-cement-block-high table. Many of the stove tables in our community are too darn tall (some are too tall even for April) because the men build then without considering how tall the cook is.
 (Eduardo and Kevin constructing the walls of the table; we left the front open for storage of wood or pots)
Eduardo built the tabletop while we were out of site one time, a pro-active bit of workmanship that was quite pleasant to encounter. So everything was ready and we set a date for the construction. We let other community members know the date, because we figured we would need some help, and we hoped all would go well.
Construction
The morning of construction, we had three youth from the community, including Julito, who had accompanied me to another volunteer's site nearly a year ago to build a couple of estufas, and then Maria Luisa came as well. It was a good thing we had that many helpers, because with collecting an extra sacko of clay from the ant hill, building the formuleta (wooden frame, held together by nails and bailing wire), mixing all the ingredients, and packing them in, it was a long hard day. Luckily, the construction site was under a tree, providing us nice shade. Before rainy season returns, they will reconstruct the roof over the stove.
 (The first load of the mix is dumped into the formuleta and packing begins; Eduardo, Maria Luisa, Cecilia, and April ensure the corners are well packed too)
The formuleta was made from lumber cut on the island. The pieces we'd purchased originally turned out to be an inch or so too short, so we had to cobble together an extra piece to make it tall enough. It didn't impact the end result, but it did delay the start as we cut extra pieces of wood.
Normally the soil mixture is made in parts, instead of all at once because that would be just too much volume to mix with a shovel. The ratio of ingredients is important, as it needs to be damp but not wet, clumpy but not sticky, etc. Each batch is tested with a ball test...a ball the size of a baseball is made and then dropped from shoulder height. In a good mix the ball will land and flatten out to about 1/2 round and show no big cracks. If the test doesn't go well you adjust the mixture until it tests well.
Once it is dumped into the formaleta, it is packed, using a big packer in the middle and smaller ones around the edge to ensure that all parts are well compacted. It is added and packed layer by layer to ensure that it is well packed.

(Eduardo using the big packer, a chunk of wood covered in a sacko so it doesn't stick to the mix)
When the formuleta was finally filled, the last touches of packing took place.
(You can see the formuleta bulging in the front right corner, pulling out the nails, from all the pounding and packing of the soil. Bulging is common at this stage as it is hard to imagine just how much force you are applying to the wood while packing... it is hard to get people to build the box strong enough to not have bulging.)
Once the formulate was packed full, it was time for lunch, and then we began to remove the wooden frame.

(Maria Luisa and Eduardo removing nails from the formuleta)
The idea is to be able to use the same formuleta on multiple stoves. We'll have to see if our wood is still in good enough shape to use it again.

(Maria Luisa and Kevin looking at the packed mud as the final pieces of the formuleta are removed)
Once the formuleta is totally removed, it is time to carve out the firebox, the "burners", the chimney hole, and the tunnels connecting them.
 (Cecilia, as the ama de casa, or woman of the house, ceremonially began the carving, cutting out the mud for the mouth of the firebox)
 It helps to have a child assist at this point, since their small hands work better than big ones in carving the small tunnels with limited access. There should be twenty centimeters between the front of the stove and the first burner, and ten centimeters between all the other holes (in this case, two burners and a chimney) and the edges.

(Cecilia working on the mouth of the firebox, and her daughters Rosaria and Soray carving out the big and small burners respectively)
While the holes are mostly carved with spoons, we also trim off the edges with a machete to remove any sharp edges, both for a smoother result and to diminish the risk of uneven drying and thus cracking. You finish off by using water to smooth out the whole surface and make it pretty.
Then, you have to wait for about thirty days for the mixture to slowly dry. Early on, each day you should apply a watery clay mixture to ensure even drying; later, it becomes an ash mixture instead, to seal it.
 (April with her hand in the main burner - the firebox is hidden in the darkness of the front side - a few days after construction)
The actual construction was done by mid-afternoon, a very full day's work. Late that afternoon, as we walked, exhausted, back to the house, we noted the clouds building and thought, how funny, here it is the summer dry season, and we might get rain. But it wasn't until we got home and the rain started pounding down that we thought, OH CRAP! THE STOVE WILL BE NOTHING BUT A PILE OF MUD! and tried to call Cecilia. We left messages on her phone and her daughter's, and hoped. Luckily, they thought of it as well and put a piece of zinc over the stove, saving all our hard work from immediate ruin.
Keep an eye out...a post about the first lighting of the stove is coming up soon!

No comments:
Post a Comment